네로개발일기

개발자 네로의 개발 일기, 자바를 좋아합니다 !

'programming language'에 해당되는 글 67건


반응형

파이썬에서 특정 시간마다 배치를 돌릴 수 있는 스케쥴링을 수행할 수 있는 모듈이 2개가 있다.

1) schedule

2) apscheduler


1) schedule

schedule은 명령어가 직관적으로 알아볼 수 있어 사용이 용이하다.

설정이 복잡해질 경우 사용 여부를 고려하는 것이 좋다.

# schedule 설치
> pip install schedule
# 사용 방법
import schedule
import time

def job():
    print("Hello world!")
    
# 10초에 한번씩 실행
schedule.every(10).seconds.do(job)
# 10분에 한번씩 실행
schedule.every(10).minutes.do(job)
# 매 시간 실행
schedule.every().hour.do(job)
# 매일 10:30 에 실행
schedule.every().day.at("10:30").do(job)
# 매주 월요일 실행
schedule.every().monday.do(job)
# 매주 수요일 13:15 에 실행
schedule.every().wednesday.at("13:15").do(job)
 
while True:
    schedule.run_pending()
    time.sleep(1)

- 함수에 인자를 전달하는 방법

# 사용 방법
import schedule
import time 

def job(text):
	print(text)
    
# job("Hello world!") 를 10초에 한번씩 실행
schedule.every(10).seconds.do(job, "text") 

while True:
    schedule.run_pending()
    time.sleep(1)


2) apscheduler

수행 방식은 3가지가 있다.

- Cron 방식: Cron 표현식으로 수행

- Date 방식: 특정 날짜에 수행

- Interval 방식: 일정 주기로 수행


각 방식마다 파라미터가 달라집니다.


스케줄 종류에는 BlockingScheduler, BackgroundScheduler 가 있다.

BlockingScheduler는 단일 수행에, BackgroundScheduler는 다중 수행에 사용된다.


# apschedule 설치
> pip install apschedule
# 사용방법

from apscheduler.schedulers.background import BackgroundScheduler
from apscheduler.jobstores.base import JobLookupError

import time

def job_1():
    print("Job1 실행: ", "| [time] "
          , str(time.localtime().tm_hour) + ":"
          + str(time.localtime().tm_min) + ":"
          + str(time.localtime().tm_sec))


def job_2():
    print("Job2 실행: ", "| [time] "
          , str(time.localtime().tm_hour) + ":"
          + str(time.localtime().tm_min) + ":"
          + str(time.localtime().tm_sec))

# BackgroundScheduler을 사용하면 start를 먼저 하고 add_job을 이용해 수행할 것을 등록해줍니다.
sched = BackgroundScheduler()
sched.start()

# interval - 매 3초마다 실행
sched.add_job(job, 'interval', seconds=3, id="test_2")

# cron 사용 - 매 5초마다 job 실행
# 	: id 는 고유 수행번호로 겹치면 수행되지 않습니다.
# 	만약 겹치면 다음의 에러 발생 => 'Job identifier (test_1) conflicts with an existing job'
sched.add_job(job_1, 'cron', second='*/5', id="test_1")

# cron 으로 하는 경우는 다음과 같이 파라미터를 상황에 따라 여러개 넣어도 됩니다.
# 	매시간 59분 10초에 실행한다는 의미.
sched.add_job(job_2, 'cron', minute="59", second='10', id="test_10")

while True:
    print("Running main process...............")
    time.sleep(1)


참고

https://pypi.org/project/APScheduler/3.2.0/


APScheduler

In-process task scheduler with Cron-like capabilities

pypi.org


728x90
반응형
blog image

Written by ner.o

개발자 네로의 개발 일기, 자바를 좋아합니다 !

반응형

5. Class field declarations proposal

- Field declarations

- private field

- static public fields


class Foo {
    x = 1;				// Field declaration 
    #p = 0; 			// Private field
    static y = 20;		// Static public field
    static #sp = 30;	// Static private field
    
    bar() {
    	this.#p = 10; 	// private 필드 참조
        // this.p = 10;	// 새로운 public p 필드를 동적 추가한다.
        return this.#p;
    }
}

const foo = new Foo();
console.log(foo); // Foo { #p: 10, x: 10 }

console.log(foo.x); // 1
// console.log(foo.#p); // SyntaxError: Undefined private field #p: must be declared in an enclosing class
console.log(Foo.y); // 20
// console.log(Foo.#sp); // SyntaxError: Undefined private field #sp: must be declared in an enclosing class
console.log(foo.bar()); // 10

위 예제는 최신 브라우저(Chrome 72 이상) 또는 최신 Node.js(버전 12 이상)에서 정상 동작한다.


6. getter, setter

1) getter

getted는 클래스 필드에 접근할 때마다 클래스 필드의 값을 조작하는 행위가 필요할 때 사용한다. getter는 메서드 이름 앞에 get 키워드를 사용해 정의한다. 이 때 메서드 이름은 클래스 필드 이름처럼 사용된다. 다시 말해 getter는 호출하는 것이 아니라 프로퍼티처럼 참조하는 형식으로 사용하며 참조 시에 메서드가 호출된다. getter는 이름 그대로 무언가를 취득할 때 사용하므로 반드시 무언가를 반환해야 한다.

class Foo {
    constructor(arr = []) {
    	this._arr = arr
    }
    
    // getter: get 키워드 뒤에 오는 메서드 이름 firstElem은 클래스 필드 이름처럼 사용된다.
    get FirstElem() {
    	// getter는 반드시 무언가를 반환해야 한다.
        return this._arr.length ? this._arr[0] : null;
    }
}

const foo = new Foo([1, 2]);
console.log(foo.firstElem); // 1

2) setter

setter는 클래스 필드에 값을 할당할 때마다 클래스 필드의 값을 조작하는 행위가 필요할 때 사용한다. setter는 메서드 이름 앞에 set 키워드를 사용해 정의한다. 이때 메서드 이름은 클래스 필드 이름처럼 사용된다. 다시 말해 setter는 호출하는 것이 아니라 프로퍼티처럼 값을 할당하는 형식으로 사용하며 할당 시에 메서드가 호출된다. 사용 방법은 아래와 같다.

class Foo {
    constructor(arr = []) {
    	this._arr = arr;
    }
    
    // getter: get 키워드 뒤에 오는 메서드 이름 firstElem은 클래스 필드 이름처럼 사용된다.
    get firstElem() {
    	// getter는 반드시 무언가를 반환해야 한다.
        return this._arr.length ? this._arr[0] : null;
    }
    
    set firstElem(elem) {
    	// ... this._arr은 this._arr를 개별요소로 분리한다.
        this._arr = [elem, ...this._arr];
    }
}

const foo = new Foo([1, 2]);

// 클래스 필드 firstElem에 값을 할당하면 setter가 호출된다.
foo.firstElem = 100;

console.log(foo.firstElem); // 100

getter와 setter는 클래스에서 새롭게 도입된 기능이 아니다. getter와 setter는 접근자 프로퍼티(accessor property)이다.

// _arr은 데이터 프로퍼티이다.
console.log(Object.getOwnPropertyDescriptor(foo, '_arr'));
// {value: Array(2), writable: true, enumerable: true, configurable: true}

// firstElem은 접근자 프로퍼티이다. 접근자 프로퍼티는 프로토타입의 프로퍼티이다.
console.log(Object.getOwnPropertyDescriptor(Foo.prototype, 'firstElem'));
// {get: ƒ, set: ƒ, enumerable: false, configurable: true}

7. 정적 메서드

클래스의 정적(static) 메서드를 정의할 때 static 키워드를 사용한다. 정적 메서드는 클래스의 인스턴스가 아닌 클래스 이름으로 호출한다. 따라서 클래스의 인스턴스를 생성하지 않아도 호출할 수 있다.

class Foo {
    constructor(prop) {
    	this.prop = prop;
    }
    
    static staticMethod() {
    	/*
       	정적 메서드는 this를 사용할 수 없다.
        정적 메서드는 내부에서 this는 클래스의 인스턴스가 아닌 클래스 자신을 가리킨다.
        */
        return 'staticMethod';
    }
    
    prototypeMethod() {
    	return this.prop;
    }
}

// 정적 메서드는 클래스 이름으로 호출한다.
console.log(Foo.staticMethod());

const foo = new Foo(123); 
// 정적 메서드는 인스턴스로 호출할 수 없다.
console.log(foo.staticMethod()); // Uncaught TypeError: foo.staticMethod is not a function

클래스의 정적 메서드는 인스턴스로 호출할 수 없다. 이것은 정적 메서드는 this를 사용할 수 없다는 것을 의미한다. 일반 메서드 내부에서 this는 클래스의 인스턴스를 가리키며, 메서드 내부에서 this를 사용한다는 것은 클래스의 인스턴스의 생성을 전제로 하는 것이다.

정적 메서드는 클래스 이름으로 호출하기 때문에 클래스의 인스턴스를 생성하지 않아도 사용할 수 있다. 단, 정적 메서드는 this를 사용할 수 없다. 달리 말하면 메서드 내부에서 this를 사용할 필요가 없는 메서드는 정적 메서드로 만들 수 있다. 정적 메서드는 Math 객체의 메서드처럼 애플리케이션 전역에서 사용할 유틸리티(Utility) 함수를 생성할 때 주로 사용한다.

정적 메서드는 클래스의 인스턴스 생성없이 클래스의 이름으로 호출하며 클래스의 인스턴스로 호출할 수 없다고 하였다. 

사실 클래스도 함수고 기존 prototype 기반 패턴의 Syntactic sugar일 뿐이다.

class Foo {}

console.log(typeof Foo); // function

위 코드를 ES5로 표현해보면 아래와 같다. ES5로 표현한 아래의 코드는 ES6의 클래스로 표현한 코드와 정확히 동일하게 동작한다.

var Foo = (function () {

    // 생성자 함수
  	function Foo(prop) {
    	this.prop = prop;
    }
    
    Foo.staticMethod = function() {
    	return 'staticMethod';
    };
    
    Foo.prototype.prototypeMethod = function() {
    	return this.prop;
    }
    
    return Foo;
}());

var foo = new Foo(123);
console.log(foo.prototypeMethod()); // 123
console.log(Foo.staticMethod()); // staticMethod
console.log(foo.staticMethod()); // Uncaught TypeError: foo.staticMethod is not a function

함수 객체(자바스크립트의 함수는 객체이다.) 는 prototype 프로퍼티를 갖는데 일반 객체와는 다른 것이며 일반 객체는 prototype 프로퍼티를 가지지 않는다.

함수 객체만이 가지고 있는 prototype 프로퍼티는 함수 객체가 생성자로 사용될 때, 이 함수를 통해 생성된 객체의 부모 역할을 하는 프로토타입 객체를 가리킨다. 위 코드에서 Foo는 생성자 함수로 사용되므로 생성자 함수 Foo의 prototype 프로퍼티가 가리키는 프로토타입 객체는 생성자 함수 Foo를 통해 생성되는 인스턴스 foo의 부모 역할을 한다.

console.log(Foo.prototype === foo.__proto__); // true

그리고 생성자 함수 Foo의 prototype 프로퍼티가 가리키는 프로토타입 객체가 가지고 있는 constructor 프로퍼티는 생성자 함수 Foo를 가리킨다.

console.log(Foo.prototype.constructor === Foo); // true

정적 메서드인 staticMethod는 생성자 함수 Foo의 메서드(함수는 객체이므로 메서드를 가질 수 있다.)이고, 일반 메서드인 prototypeMethod는 프로토타입 객체 Foo.prototype의 메서드이다. 따라서 staticMethod는 foo에서 호출할 수 없다.


프로토타입과 정적 메서드

8. 클래스 상속

클래스 상속(Class Inheritance)은 코드 재사용 관점에서 매우 유용하다. 새롭게 정의할 클래스가 기존에 있는 클래스와 매우 유사하다면, 상속을 통해 그대로 사용하되 다른 점만 구현하면 된다.

1) extends 키워드

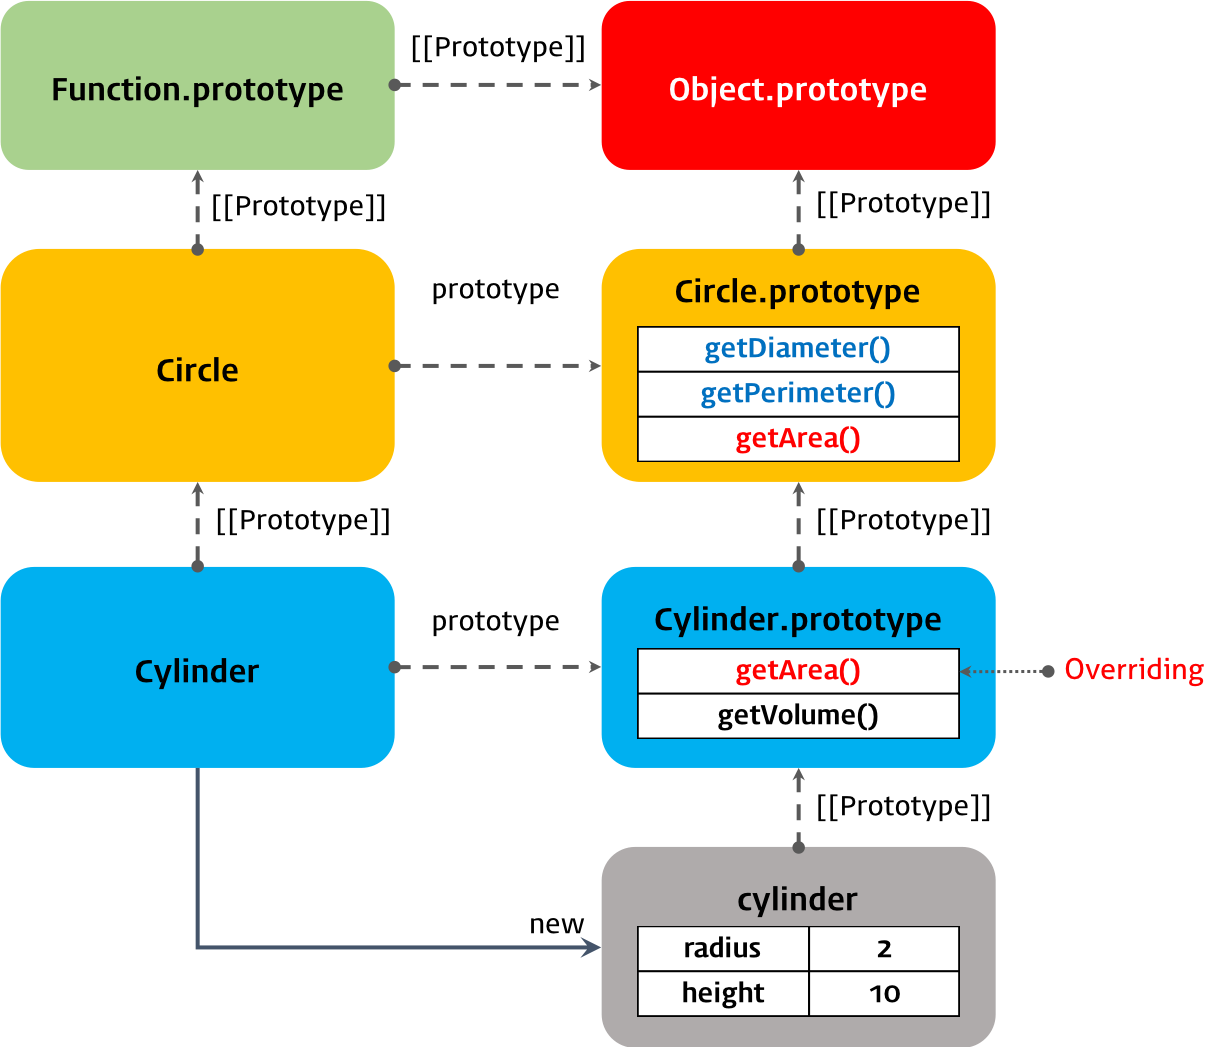
extends 키워드는 부모 클래스(base class)를 상속받는 자식 클래스(sub class)를 정의할 때 사용한다. 부모 클래스 Circle을 상속받는 자식 클래스 Cylinder를 정의하자.

// 부모 클래스
class Circle {
    constructor(radius) {
    	this.radius = radius;
    }
    
    getDiameter() {
    	return 2 * this.radius;
    }
    
    getPerimeter() {
    	return 2 * Math.PI * this.radius;
    }
    
    getArea() {
    	return Math.PI * Math.pow(this.radius, 2);
    }
}

// 자식 클래스
class Cylinder extends Circle {
    constructor(radius, height) {
    	super(radius);
        this.height = height;
    }
    
    getArea() {
    	return (this.height * super.getPerimeter()) + (2 * super.getArea());
    }
    
    getVolume() {
    	return super.getArea() * this.height;
    }
}

const cylonder = new Cylinder(2, 10);

// 원의 지름
console.log(cylinder.getDiameter());  // 4
// 원의 둘레
console.log(cylinder.getPerimeter()); // 12.566370614359172
// 원통의 넓이
console.log(cylinder.getArea());      // 150.79644737231007
// 원통의 부피
console.log(cylinder.getVolume());    // 125.66370614359172

// cylinder는 Cylinder 클래스의 인스턴스이다.
console.log(cylinder instanceof Cylinder); // true
// cylinder는 Circle 클래스의 인스턴스이다.
console.log(cylinder instanceof Circle);   // true

* 오버라이딩(Overriding)

상위 클래스가 가지고 있는 메서드를 하위 클래스가 재정의하여 사용하는 방식

* 오버로딩(Overloading)

매개변수의 타입 또는 갯수가 다른, 같은 이름의 메서드를 구현하고 매개변수에 의해 메서드를 구별하여 호출하는 방식이다. 자바스크립트는 오버로딩을 지원하지 않지만 arguments 객체를 사용하여 구현할 수 는 있다.


위 코드를 프로토타입 관점으로 표현하면 아래와 같다. 인스턴스 cylinder는 프로토타입 체인에 의해 부모 클래스 Circle의 메서드를 사용할 수 있다.

클래스 상속

console.log(cylinder.__proto__ === Cylinder.prototype); // true
console.log(Cylinder.prototype.__proto__ === Circle.prototype); // true
console.log(Circle.prototype.__proto__ === Object.prototype); // true
console.log(Object.prototype.__proto__ === null); // true

프로토타입 체인은 특정 객체의 프로퍼티나 메서드에 접근하려고 할 때 프로퍼티 또는 메서드가 없다면 [[Prototype]] 내부 슬롯이 가리키는 링크를 따라 자신의 부모 역할을 하는 프로토타입 객체의 프로퍼티나 메서드를 차례대로 검색한다. 그리고 검색에 성공하면 그 프로퍼티나 메서드를 사용한다.

2) super 키워드

super 키워드는 부모 클래스를 참조(Reference)할 때 또는 부모 클래스의 constructor를 호출할 때 사용한다.


3) static 매서드와 prototype 메서드의 상속

프로토타입 관점에서 바라보면 자식 클래스의 [[Prototype]] 내부 슬롯이 가리키는 프로토타입 객체는 부모 클래스이다.

class Parent {}
class Child extends Parent {}

console.log(Child.__proto__ === Parent); // true
console.log(Child.prototype.__proto__ === Parent.prototype); // true

자식 클래스의 Child의 프로토타입 객체는 부모 클래스의 Parent이다.

이것을 프로토타입 체인(Prototype Chain)에 의해 부모 클래스의 정적 메서드도 상속됨을 의미한다.

class Parent {
    static staticMethod() {
    	return 'staticMethod';
    }
}

class Child extends Parent {}

console.log(Parent.staticMethod()); // 'staticMethod'
console.log(Child.staticMethod()); // 'staticMethod'

자식 클래스의 정적 메서드 내부에서도 super 키워드를 사용하여 부모 클래스의 정적 메서드를 호출할 수 있다. 자식 클래스는 프로토타입 체인에 의해 부모 클래스의 정적 메서드를 참조할 수 있기 때문이다.

하지만 자식 클래스의 일반 메서드(프로토타입 메서드) 내부에서는 super 키워드를 사용하여 부모 클래스의 정적 메서드를 호출할 수 없다. 이는 자식 클래스의 인스턴스는 프로토타입 체인에 의해 부모 클래스의 정적 메서드를 참조할 수 없기 때문이다.

class Parent {
    static staticMethod() {
    	return 'Hello';
    }
}

class Child extends Parent {
	static staticMethod() {
    	return `${super.staticMethod()} world`;
    }
    
    prototypeMethod() {
    	return `${super.staticMethod()} world`;
    }
}

console.log(Parent.staticMethod()); // 'Hello'
console.log(Child.staticMethod()); // 'Hello world'
console.log(Child.prototypeMethod()); // TypeError: {intermediate value).staticMethod is not a function

prototype chain에 의한 메서드 상속

728x90
반응형

'programming language > ECMAScript6' 카테고리의 다른 글

[ES6] 프로미스 (Promise)  (1) 2021.12.27
[ES6] 모듈 (Module)  (0) 2021.12.20
[ES6] 클래스(1)  (2) 2021.12.15
[ES6] 디스트럭처링 (Destructuring)  (0) 2021.12.14
[ES6] 객체 리터럴 프로퍼티 기능 확장  (0) 2021.12.13
blog image

Written by ner.o

개발자 네로의 개발 일기, 자바를 좋아합니다 !

반응형

자바스크립트는 프로포타입 기반(prototype-based) 객체지향 언어이다. 비록 다른 객체 지향 언어들과의 차이점에 대한 논쟁이 있긴 하지만, 자바스크립트는 강력한 객체지향 프로그래밍 능력을 지니고 있다.


프로토타입 기반 프로그래밍은 클래스가 필요없는(class-free) 객체지향 프로그래밍 스타일로 프로토타입 체인과 클로저 등으로 객체 지향 언어의 상속, 캡슐화(정보 은닉) 등의 개념을 구현할 수 있다.


ES5에서는 생성자 함수와 프로토타입, 클로저를 사용하여 객체 지향 프로그래밍을 구현하였다.

// ES5
var person = (function() {
    // Constructor
    function Person(name) {
    	this._name = name;
    }
    
    // public method
    Person.prototype.sayHi = function() {
    	console.log('Hi! ' + this._name);
    };
    
    // return constructor
    return Person;
}());

var me = new Person('Jeon');
me.sayHi(); // Hi Jeon.

console.log(me instanceof Person); // true


클래스 기반 언어에 익숙한 프로그래머들은 프로토타입 기반 프로그래밍 방식이 혼란스러울 수 있다.


ES6의 클래스는 기존 프로토타입 기반 객체지향 프로그래밍보다 클래스 기반 언어에 익숙한 프로그래머보다 빠르게 학습할 수 있는 단순명료한 새로운 문법을 제시하고 있다. 사실 클래스도 함수이며 기존 프로토타입 기반 패턴의 문법적 설탕(Syntactic sugar)이라고 볼 수 있다. 다만, 클래스와 생성자 함수가 정확히 동일하게 동작하지는 않는다. 클래스가 보다 엄격하다. 따라서 클래스를 프로토타입 기반 패턴의 문법적 설탕이라고 인정하지 않는 견해도 일리가 있다.


1. 클래스 정의 (Class Definition)

ES6 클래스는 class 키워드를 사용하여 정의한다. 앞에서 살펴본 Person 생성자 함수를 클래스로 정의해보자.

클래스 이름은 생성자 함수와 마찬가지로 파스칼 케이스를 사용하는 것이 일반적이다. 파스칼 케이스를 사용하지 않아도 에러가 발생하지는 않는다.

// 클래스 선언문
class Person {
    // constructor(생성자)
    constructor(name) {
    	this._name = name;
    }
    
    sayHi() {
    	console.log(`Hi! ${this._name}`);
    }
}

// 인스턴스 생성
const me = new Person('Jeon');
me.sayHi(); // Hi! Jeon

console.log(me instanceof Person); // true

클래스는 클래스 선언문 이전에 참조할 수 없다.

console.log(Foo); 
// ReferenceError: Cannot access 'Foo' before initialization

class Foo {}

하지만 호이스팅이 발생하지 않은 것은 아니다. 클래스는 var 키워드로 선언한 변수처럼 호이스팅이 되지 않고 let, const로 선언한 변수처럼 호이스팅된다. 따라서 클래스 선언문 이전에 일시적 사각지대(Temporal Dead Zone; TDZ)에 빠지기 때문에 호이스팅이 발생하지 않는 것처럼 동작한다.

const Foo = '';

{
    // 호이스팅이 발생하지 않는다면 ''가 출력되어야 한다.
    console.log(Foo);
    // ReferenceError: Cannot access 'Foo' before initialization
    class Foo {}
}

클래스 선언문도 변수 선언, 함수 정의와 마찬가지로 호이스팅이 발생한다. 호이스팅은 var, let, const, function, function*, class 키워드를 사용한 모든 선언문에 적용된다. 다시 말해, 선언문을 통해 모든 식별자(변수, 함수, 클래스 등)는 호이스팅된다. 모든 선언문은 런타임 이전에 먼저 실행되기 때문이다. 

일반적이지는 않지만, 표현식으로도 클래스를 정의할 수 있다. 함수와 마찬가지로 클래스는 이름을 가질 수도 갖지 않을 수도 있다. 이때 클래스가 할당된 변수를 사용해 클래스를 생성하지 않고 기명 클래스의 클래스 이름을 사용해 클래스를 생성하면 에러가 발생한다. 이는 함수와 마찬가지로 클래스 표현식에서 사용한 클래스 이름은 외부 코드에서 접근 불가능하기 때문이다. 

// 클래스명 MyClass는 함수 표현식과 동일하게 클래스 몸체 내부에서만 유효한 식별자이다.
const Foo = class MyClass {};

const foo = neew Foo();
console.log(foo); // MyClass {}

new MyClass(); // ReferenceError: MyClass is not defined

2. 인스턴스 생성

마치 생성자 함수와 같이 new 연산자와 함께 클래스 이름을 호출하면 클래스의 인스턴스가 생성된다.

class Foo {}

const foo = new Foo();

위 코드에서 new 연산자와 함께 호출한 Foo는 클래스의 이름이 아니라 constructor(생성자)이다. 표현식이 아닌 선언식으로 정의한 클래스의 이름은 constructor와 동일하다.

console.log(Object.getPrototypeOf(foo).constructor === Foo); // true

new 연산자를 사용하지 않고 constructor를 호출하면 타입 에러(Type Error)가 발생한다.

constructor는 new 연산자 없이 호출할 수 없다.

class Foo {}

const foo = Foo(); // TypeError: Class constructor Foo cannot be invoked without 'new'

3. constructor

constructor는 인스턴스를 생서아고 클래스 필드를 초기화하기 위한 특수한 메소드이다.

클래스 필드(class field)

클래스 내부의 캡슐화된 변수를 말한다. 데이터 멤버 또는 멤버 변수라고도 부른다. 클래스 필드는 인스턴스의 프로퍼티 또는 정적 프로퍼티가 될 수 있다. 쉽게 말해 자바스크립트의 생성자 함수에서 this에 추가한 프로퍼티를 클래스 기반 객체지향언어에서는 클래스 필드라고 부른다.

// 클래스 선언문
class Person {
    // constructor(생성자)
    constructor(name) {
        // this는 클래스가 생성할 인스턴스를 가리킨다.
        // _name은 클래스 필드이다.
        this._name = name;
    }
}

// 인스턴스 생성
const me = new Person('Jeon');
console.log(me); // Person { _name: 'Jeon' }

constructor는 클래스 내에 한 개만 존재할 수 있으며 만약 클래스 2개 이상의 constructor를 포함하면 문법 에러(SyntaxError)가 발생한다. 인스턴스를 생성할 때 new 연산자와 함께 호출한 것이 바로 constructor이며 constructor의 파라미터에 전달한 값은 클래스 필드에 할당한다.

constructor는 생략할 수 있다. constructor를 생략하면 클래스에 constructor() {}를 포함한 것과 동일하게 동작한다. 즉, 빈 객체를 생성한다. 따라서 인스턴스에 프로퍼티를 추가하려면 인스턴스를 생성한 이후, 프로퍼티를 동적으로 추가해야 한다.

class Foo { }

const foo = new Foo();
console.log(foo); // Foo {}

// 프로퍼티 동적 할당 및 초기화
foo.num = 1;
console.log(foo); // Foo { num: 1 }

constructor는 인스턴스의 생성과 동시에 클래스 필드의 생성과 초기화를 실행한다. 따라서 클래스 필드를 초기화해야 한다면 constructor를 생략해서는 안된다.

class Foo {
    // constructor는 인스턴스의 생성과 동시에 클래스 필드의 생성과 초기화를 실행한다.
    constructor(num) {
    	this.num = num;
    }
}

const foo = new Foo(1);

console.log(foo); // Foo { num: 1 }

4. 클래스 필드

클래스 몸체(class body)에는 메서드만 선언할 수 있다. 클래스 바디에 클래스 필드(멤버 변수)를 선언하면 문법 에러(SyntaxError)가 발생한다.

class Foo {
    name = ''; // SyntaxError
    
    constructor() {}
}

클래스 필드의 선언과 초기화는 반드시 constructor 내부에서 실시한다.

class Foo {
    constructor(name = '') {
    	this.name = name; // 클래스 필드의 선언과 초기화
    }
}

const foo = new Foo('Jeon');
console.log(foo); // Foo { name: 'Jeon' }

constructor 내부에서 선언한 클래스 필드는 클래스가 생성할 인스턴스를 가리키는 this에 바인딩한다. 이로써 클래스 필드는 클래스가 생성할 인스턴스의 프로퍼티가 되며, 클래스의 인스턴스를 통해 클래스 외부에서 언제나 참조할 수 있다. 즉, 언제나 public 이다.

ES6의 클래스는 다른 객체지향 언어처럼 private, public, protected 키워드와 같은 접근 제한자(access modifier)를 지원하지 않는다.

class Foo {
    constructor(name = '') {
    	this.name = name; // public 클래스 필드
    }
}

const foo = new Foo('Jeon');
console.log(foo.name); // 클래스 외부에서 참조할 수 있다.
728x90
반응형
blog image

Written by ner.o

개발자 네로의 개발 일기, 자바를 좋아합니다 !

반응형

디스트럭처링(Destructuring)은 구조화된 배열 또는 객체를 Destructuring(비구조화, 파괴)하여 개별적인 변수에 할당하는 것이다. 배열 또는 객체 리터럴에서 필요한 값만을 추출하여 변수에 할당하거나 반환할 때 유용하다.


1. 배열 디스트럭처링(Array destructuring)

ES5에서 배열의 각 요소를 배열로부터 디스트럭처링하여 변수에 할당하기 위한 방법은 아래와 같다.

// ES5
var arr = [1, 2, 3];

var one = arr[0];
var two = arr[1];
var three = arr[2];

console.log(one, two, three); // 1 2 3

ES6의 배열 디스트럭처링은 배열의 각 요소를 배열로부터 추출하여 변수 리스트에 할당한다. 이때 추출/할당 기준은 배열의 인덱스이다.

// ES6 Destructuring
const arr = [1, 2, 3];

// 배열의 인덱스를 기준으로 배열로부터 요소를 추출하여 변수에 저장
// 변수 one, two, three가 선언되고 arr(initializer(초기화자))가 Destructuring(비구조화, 파괴)되어 할당된다.
const [one, two, three] = arr;
// 디스트럭처링을 사용할 때는 반드시 initializer(초기화자)를 할당해야 한다. 
// const[one, two, three]; // SyntaxError: Missing initializer in destructuring declaration

console.log(one, two, three); // 1 2 3

배열 디스트럭처링을 위해서는 할당 연산자 왼쪽에 배열 형태의 변수 리스트가 필요하다.

let x, y, z;
[x, y, z] = [1, 2, 3];

// 위의 구문과 동치이다.
let [x, y, z] = [1, 2, 3];

왼쪽의 변수 리스트와 오른쪽의 배열은 배열의 인덱스 기준으로 할당된다.

let x, y, z;

[x, y] = [1, 2];
console.log(x, y); // 1 2

[x, y] = [1];
console.log(x, y); // 1 undefined

[x, y] = [1, 2, 3];
console.log(x, y); // 1 2

[x, , z] = [1, 2, 3];
console.log(x, z); // 1 3

[x, y, z = 3] = [1, 2];
console.log(x, y, z); // 1 2 3

[x, y = 10, z = 3] = [1, 2];
console.log(x, y, z); // 1 2 3

[x, ...y] = [1, 2, 3];
console.log(x, y); // 1 [ 2, 3 ]

ES6의 배열 디스트럭처링은 배열에서 필요한 요소만 추출하여 변수에 할당하고 싶은 경우에 유용하다. 아래의 코드는 Date 객체에서도 년도, 월, 일을 추출하는 예제이다.

const today = new Date();
const formattedDate = today.toISOString().substring(0, 10); // "2022-01-02"
const [year, month, day] = formattedDate.split('-');
console.log([year, month, day]); // [ '2022', '01', '02' ]


2. 객체 디스트럭처링 (Object destructuring)

ES5에서 객체의 각 프로퍼티를 객체로부터 디스트럭처링하여 변수에 할당하기 위해서는 프로퍼티 이름(키)을 사용해야 한다. 

// ES5
var obj = { firstName: 'Jiyoon', lastName: 'Jeon' };

var firstName = obj.firstName;
var lastName = obj.lastName;

console.log(firstName, lastName); // Jiyoon Jeon

ES6의 객체 디스트럭처링은 객체의 각 프로퍼티를 객체로부터 추출하여 변수 리스트에 할당한다. 이때 할당 기준은 프로퍼티 이름(키)이다.

// ES6 Destructuring
const obj = { firstName: 'Jiyoon', lastName: 'Jeon' };

// 프로퍼티 키를 기준으로 디스트럭처링 할당이 이루어진다. 순서는 의미가 없다. 
// 변수 lastName, firstName가 선언되고 obj(initializer(초기화자))가 Destructuring(비구조화, 파괴)되어 할당된다.
const { lastName, firstName } = obj;

console.log(firstName, lastName); // Jiyoon Jeon

객체 디스트럭처링을 위해서는 할당 연산자 왼쪽에 객체 형태의 변수 리스트가 필요하다.

// 프로퍼티 키가 prop1인 프로퍼티의 값을 변수 p1에 할당 
// 프로퍼티 키가 prop2인 프로퍼티의 값을 변수 p2에 할당
const { prop1: p1, prop2: p2 } = { prop1: 'a', prop2: 'b' }; 
console.log(p1, p2); // 'a' 'b'
console.log({ prop1: p1, prop2: p2 }); // { prop1: 'a', prop2: 'b' }

// 아래는 위의 축약형이다.
const { prop1, prop2 } = { prop1: 'a', prop2: 'b' };
console.log({ prop1, prop2 }); // { prop1: 'a', prop2: 'b' }

// default value
const { prop1, prop2, prop3 = 'c' } = { prop1: 'a', prop2: 'b' };
console.log({ prop1, prop2, prop3 }); // { prop1: 'a', prop2: 'b', prop3: 'c' }

객체 디스트럭처링은 객체에서 프로퍼티 이름(키)으로 필요한 프로퍼티 값만 추출할 수 있다. 

const todos = [
    { id: 1, content: 'HTML', completed: true },
    { id: 2, content: 'CSS', completed: false },
    { id: 3, content: 'JS', completed: false }
];

// todos 배열의 요소인 객체로부터 completed 프로퍼티만을 추출한다.
const completedTodos = todos.filter(({ completed }) => completed);
console.log(completedTodos); // [ { id: 1, content: 'HTML', completed: true } ]

Array.proptotype.filter 메서드의 콜백 함수는 대상 배열(todos)을 순회하며 첫 번째 인자로 대상 배열의 요소를 받는다. 이때 필요한 프로퍼티(completed 프로퍼티)만을 추출할 수 있다.


중첩 객체의 경우는 아래와 같이 사용한다.

const person = {
    name: 'Jeon',
    address: {
    	zipCode: '05407',
        city: 'Seoul'
    }
};

const { address: {city} } = person;
console.log(city); // Seoul
728x90
반응형
blog image

Written by ner.o

개발자 네로의 개발 일기, 자바를 좋아합니다 !

반응형

ES6에서는 객체 리터럴 프로퍼티 기능을 확장하여 더욱 간편하고 동적인 객체 생성 기능을 제공한다.


1. 프로퍼티 축약 표현

ES6에서 객체 리터럴의 프로퍼티는 프로퍼티 이름과 프로퍼티 값으로 구성된다. 프로퍼티의 값은 변수에 할당된 값일 수도 있다.

// ES5
var x = 1, y = 2;

var obj = {
    x: x,
    y: y
};

console.log(obj); // { x: 1, y: 2 }

ES6에서는 프로퍼티 값으로 변수를 사용하는 경우, 프로퍼티 이름을 생략(Property shorthand)할 수 있다. 이때 프로퍼티 이름은 변수의 이름으로 자동 생성된다.

// ES6
let x = 1, y = 2;

const obj = { x, y };

console.log(obj); // { x: 1, y: 2 }


2. 프로퍼티 키 동적 생성

문자열 또는 문자열로 변환 가능한 값을 반환하는 표현식을 사용해 프로퍼티 키를 동적으로 생성할 수 있다. 단, 프로퍼티 키로 사용할 표현식을 대괄호 [...]로 묶어야 한다. 이를 계산된 프로퍼티 이름(Computed property name)이라 한다.

// ES5
var prefix = 'prop';
var i = 0;

var obj = {};

obj[prefix + '-' + ++i] = i;

console.log(obj); // [prop-1: 1, prop-2: 2, prop-3: 3]

ES6에서는 객체 리터럴 내부에서도 프로퍼티 키를 동적으로 생성할 수 있다.

// ES6
const prefix = 'prop';
let i = 0;

const obj = {
	[`${prefix}-${++i}`]: i,
	[`${prefix}-${++i}`]: i,
	[`${prefix}-${++i}`]: i
};

console.log(obj); // {prop-1: 1, prop-2: 2, prop-3: 3}

3. 메서드 축약 표현

ES5에서 메서드를 선언하려면 프로퍼티 값으로 함수 선언식을 할당한다. 

// ES5
var obj = {
    name: 'Lee',
    sayHi: function() {
    	console.log('Hi!' + this.name);
    }
};

obj.sayHi(); // Hi! Lee

ES6에서는 메서드를 선언할 때, function 키워드를 생략한 축약 표현을 사용할 수 있다. 

// ES6
const obj = {
    name: 'Lee',
    // 메소드 축약 표현
    sayHi() {
    	console.log('Hi!' + this.name);
    }
};
obj.sayHi(); // Hi! Lee

4. __proto__ 프로퍼티에 의한 상속

ES5에서 객체 리터럴을 상속하기 위해서는 Object.create() 함수를 사용한다. 이를 프로토타입 패턴 상속이라 한다.

// ES5
var parent = {
    name: 'parent',
    sayHi: function() {
    	console.log('Hi!' + this.name);
    }
};

var child = Object.create(parent);
child.name = 'child';

parent.sayHi(); // Hi! parent
child.sayHi(); // Hi! child

ES6에서는 객체 리터럴 내부에서 __proto__ 프로퍼티를 직접 설정할 수 있다. 이것은 객체 리터럴에 의해 생성된 객체의 __proto__ 프로퍼티에 다른 객체를 바인딩해서 상속을 표현할 수 있음을 의미한다.

// ES6
const parent = {
    name: 'parent', 
    sayHi() {
    	console.log('Hi!' + this.name);
    }
};

const child = {
	__proto__: parent,
    name: 'child'
};

parent.sayHi(); // Hi! parent
child.sayHi(); // Hi! child
728x90
반응형
blog image

Written by ner.o

개발자 네로의 개발 일기, 자바를 좋아합니다 !